


INSTRUCTIONS FOR THE HARDWARE
You should examine your hardware when it comes in so that you familiarize yourself with it in its proper application.
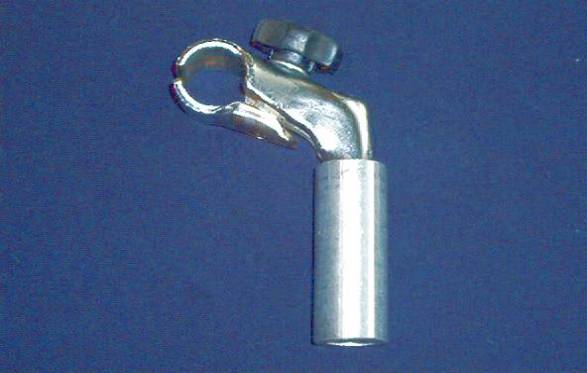
This is designed to attach the vertical (from a swimming pool supply shop) pole to the top horizontal pole (from a plumbing supply shop) supporting the banner.
You will notice that the bicycle stem is converted into a clamp and the top knob attaches to a screw that goes through and connects to the bottom section of the clamp. The screw has one or more punches on the end of it so that the threads have been distorted.
If you take the knob and back it out as you loosen the knob you discover the screw stops when it hits the end of its threads. This is designed to allow you to disconnect the clamp from your top horizontal banner pole without the parts coming completely apart.
The reason it stops before it is fully disengaged is so that when you get on the street and are either putting it together or taking it apart, you don’t have to worry about losing parts if they were to come apart.
You want to instruct anybody who goes out there with you NOT TO HORSE THIS TOP SCREW OUT and think that they have got to detach this whole system. If somebody does get forceful with it and thinks they have to detach the whole thing from the coupler then they are going to mess this piece of equipment up.
The knob itself is made out of shatterproof material. My pole has gotten knocked over several times when in storage and the knobs have shattered. We’ve tracked down these knobs that don’t shatter. I’m not saying that it won’t shatter if you drop it, but we tested them and I have not had one break since we put these new knobs on. If you push the knob in the orange plastic insert will pop out. Don’t do it or you will have to replace it to keep your knob from running down on the screw when it is loosened and you will have to hold it up while you are tightening it.
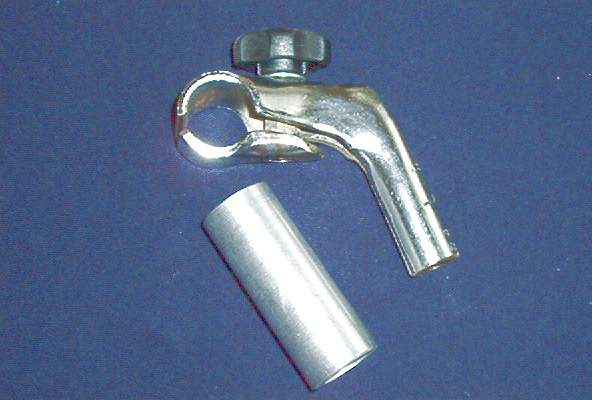
The aluminum adapter (lower piece) is designed to fit snugly on the inside of a swimming pool cleaning pole. It is milled to the precise size of a swimming pool utility pole so don’t try and scrimp. The pool pole is universal in the US and Europe because of the attachments used all over.
They can rest on the ground and still get the banner way above the crowd even if somebody gets on somebody else’s shoulders and tries to knock it down. You can extend it on up and lift it higher if the crowd is unruly which they are sometimes. The swimming pole is sturdy enough and yet light enough to give you better control of your banner even in a breeze. If you fly with it you can cut sections of these poles off and get through the 72” limit on airlines also.
They are about $20.00.
I have found this to be the easiest way to connect or disconnect this coupler from the horizontal bar.
Hold the banner horizontal pipe/bar/rod into the top semi circle of the top part of the clamp and then let the lower piece dangle down or drop down as you unscrew it until finally it will spin to the left of the banner rod. Once it spins you are disengaged or ready to place it on the rod and begin tightening.
I’ve also found that the safest thing to do is to go ahead and tighten the clamp back up when you transport it even though the threads are distorted on the clamp screws. That is something I have started to do after losing 2 or more of these things out on the highway. So just go ahead and tighten it back down or at least get it snug and firm so that it won’t jiggle a lot.
If you have ever found it necessary, for example, your screw rusts up or something like that - if you will get a file or put it on a whet stone or something like that and knock the bent threads off, then it should unscrew. Then you can pop the little orange cap out of the middle and replace that bolt. When you get your new replacement bolt then go ahead and mess the threads up again with a punch that will tap those threads and bend them a little bit.
Put the lower clamp on to the vertical pole before you attach the top clamp.
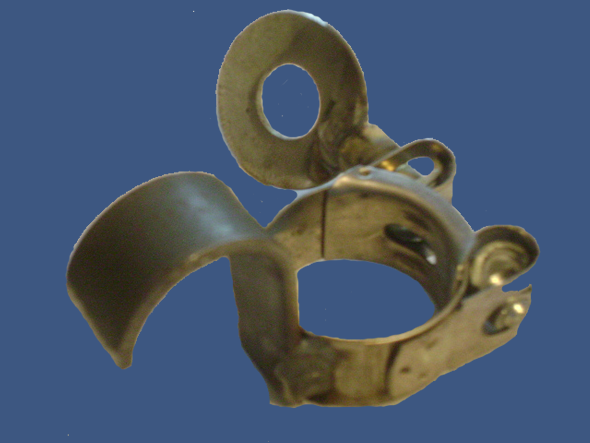
The hook clamp should be toward the top.You put this piece on before you put the top piece on.
You slide the clamp down the pole where the hooked piece of the clamp is going to be on the top so that if you hook on the
bottom horizontal pole you can pull it down a little bit and tighten it down
with the clamp. You tighten the clamp on the bottom horizontal rod so that the
rod doesn’t slide back and forth in the clamp and tear up your banner.
The threads on the
nut that tightens this bracket to the vertical pole are distorted so that will
not come off. It really gets very
little use, just a minor adjustment springs it loose to be able to slide it up
and down and a minor tightening secures it so that you don’t have to put a lot
of pressure on it.
The threads on the
screw on the bottom knob are distorted. You do have to loosen this screw quite
a bit to let the lower clamp piece come down to get the lower horizontal rod in
or out because of the hook on the top part of the bracket. So just be careful
not to force the screw out beyond the distorted threads.
We hope this has been
helpful to you. If you’re not mechanically challenged this has been a waste of
time, but challenged or not, if you mess
up your stuff and didn’t read the instructions you don’t have an acceptable
excuse for a replacement part!!!!
These parts cost us $ 30.00- 40.00 each set not counting all
the donated labor that goes into machining and assembling them. If you want a set of hardware the price is $30.00 each set including shipping. You should make your check out to the Bible Baptist Church of Bolivar and send it 12875 Hwy.18 South, Bolivar TN 38008 Designated for banner hardware and send me an eMail letting me know it is in the mail.
Brother Ken Lansing
3060 Woodhills Dr.
Memphis, TN 38128
(901) 386-2035
Ken Lansing: ken@winfarms.com